1. To replace the horn on a 2018 F150, you will need replacement horns, pliers, a ratchet set and a flathead screwdriver.
2. Start by opening up the hood of your truck and locating the battery box behind the radiator overflow tank.
3. Disconnect both battery cables then use pliers to remove any electrical connectors that are attached to your old horns.
4. Use the ratchet set to loosen and remove all mounting bolts from both horns then carefully pull them out of their mounts being careful not to damage any wiring or hoses nearby while doing so.
5. Install new horns into their respective locations making sure they are properly aligned with their mounting holes and tighten all bolts firmly with your ratchet wrench again being careful not to over-tighten them as this could cause further damage or deterioration of parts in the area around it over time due to excessive pressure applied directly onto those components for extended periods of time without proper support or cushioning materials between them like rubber grommets which can be easily purchased at local hardware stores in most cases if needed depending on what type/brand of horn is installed into place beforehand prior too replacing these items altogether once more than likely after many years have passed since installation has taken place initially when performing routine maintenance checks upon such vehicles themselves throughout its entire lifetime ownership experience overall!
- Step 1: Locate the Horn – First, you will need to locate the horn in your vehicle
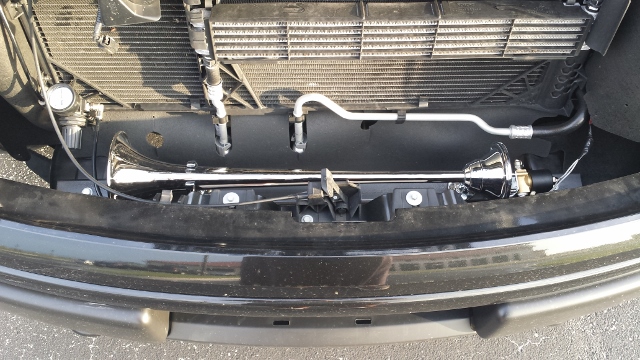
- For a 2018 F150, the horn is located in front of the radiator behind the grille
- You can access it from under the hood or from underneath the truck
- Step 2: Disconnect Battery Cables – Once you have located where your horn is situated, disconnect both battery cables for safety reasons so that no power flows through and causes an accident during replacement
- Step 3: Remove Old Horn – Use a wrench to unscrew and remove any bolts holding down your old car horn and disconnect any wiring attached to it as well
- Carefully pull out your old car horn from its position without causing damage to surrounding parts or components like electrical wires they may be connected too
- Step 4: Install New Horn – Take out new horns packaging contents which should include mounting hardware such as screws, nuts, washers etc
- , along with instructions on how to install them properly onto your 2018 F150 vehicle model’s frame/grill area
- Follow these instructions carefully and use appropriate tools such as wrenches or pliers when tightening up all necessary mounting hardware items included with purchase of new car horn kit for proper installation process completion
- Step 5: Reconnect Wiring & Battery Cables – Finally reconnect both negative (black)and positive (red) battery cables back into their original positions after verifying that all wiring connections are secure within new car horns position before turning ignition key switch on again allowing current flow throughout vehicles entire power system once more
REPLACING 2018-2020 FORD F150 Horn!
2018 F150 Horn Location
The horn on Ford’s 2018 F150 is located in the engine compartment near the firewall. It is situated to the right of the battery and can be accessed by opening up the hood. With its easy access, you’ll have no trouble honking your way through traffic!
2019 Ford F150 Horn Replacement
Replacing the horn on a 2019 Ford F-150 is a straightforward process that requires minimal tools and can be completed in under an hour. Start by disconnecting the negative battery cable, which will prevent any accidental electrical shorts during the repair. Then locate the horn assembly, unscrew it from its mount, and disconnect any wiring harnesses still connected to it.
Once everything has been uninstalled, you can test your new horn before mounting it back onto your vehicle. With just a few simple steps, you’ll have your Ford F-150 sounding loud and proud once again!
F150 Horn Upgrade
If you’re looking to upgrade the horn on your Ford F150, it’s important to do some research first. Depending on the model year and trim level of your truck, there are a variety of options available in terms of aftermarket horns that can provide better sound quality than the factory horn. Be sure to check with local car audio stores for advice about which type will fit best for your vehicle, as well as any installation instructions that may be required.
With a few simple tools and a bit of patience, you can have an upgraded horn in no time!
2015 Ford F150 Horn Replacement
Replacing the horn on your 2015 Ford F150 is a relatively simple process. All you need to do is locate the fuse box, disconnect the negative battery terminal, remove the steering wheel cover and airbag assembly and then disconnect the wiring from the old horn. Finally, install and connect your new horn before replacing all of the pieces in their original positions.
With just a few basic tools and some patience, you can have your 2015 Ford F150 sounding like new in no time!
F150 Horn Replacement
Replacing the horn on a Ford F150 is a simple task that can be completed in about an hour. You will need to remove the grill and locate the factory horns, then disconnect them and replace them with new ones. Make sure you have all necessary tools and hardware ready before starting as it can become time consuming if you don’t.
With patience and some elbow grease, your Ford F150 will sound like new again!
Ford F150 Horn Problems
The Ford F150 is one of the most popular truck models in the United States, but it can be prone to horn problems. These issues can range from a malfunctioning horn switch or relay to a shorted wire. If your F150’s horn fails to sound when you press it, then it might be time for some troubleshooting and repairs.
It’s important to remember that this type of repair should only be undertaken by an experienced mechanic as improper repairs could cause further damage to the truck.
Credit: www.f150forum.com
Where is the Horn Located on a 2018 Ford F150?
The horn on a 2018 Ford F150 is located just inside the front grille, to the left of the steering wheel. The location of the horn can be easily identified by its circular shape and distinctive “horn” symbol. To access it, open up the hood and locate where the horn is mounted.
You may need to remove a few screws or bolts depending on how your vehicle was assembled. Once you have accessed it, simply press down on it with your finger or use a screwdriver to sound off! By knowing where this important safety feature is located on your 2018 Ford F150, you can ensure that you are able to alert others when in an emergency situation out on the road.
How to Remove F150 Horn?
Answer: To remove a Ford F150 horn, first open the hood and locate the two screws that hold it in place. Unscrew them with a Phillips-head screwdriver and then carefully lower the horn assembly down through the grill. Disconnect any wiring harnesses leading to or from the horn assembly and remove it from under the hood.
Removing your Ford F150’s factory horn is not overly complicated, but does require some patience and basic knowledge of car repair. First, you will need to open your vehicle’s hood and locate where your horn is mounted on the firewall – this can usually be found near either side of your radiator grille. Once located, use a Phillips-head screwdriver to unscrew and release both screws that are holding it in place.
Carefully lower down the entirehorn assembly and disconnect any wiring harnesses connected to or from it before removing completely from underneath your vehicle’s hood. With these steps completed, you should now have successfully removed your old Ford F150 Horn!
Where is the Fuse Box on a 2018 Ford F150?
The fuse box on a 2018 Ford F150 is located under the dashboard, to the left of the steering wheel. The cover can be easily removed by pressing down on its two tabs and then lifting it up. Once opened, you will see a diagram with labels that identify each fuse and relay.
There are generally two relays for the headlights and one for the horn. You may have to refer to your owner’s manual for more specific details about which fuses control certain components in your vehicle. With this information at hand, you should be able to locate any blown fuses quickly and easily if needed.
Having access to a functioning fuse box in your Ford F150 is essential when it comes time for maintenance or repairs as identifying which part might need attention can often depend on understanding how the electrical system works within your vehicle. Knowing where it is located in advance can save time during an emergency situation when something needs immediate attention such as replacing a broken headlight or installing additional accessories like audio speakers or LED lighting kits. Taking steps ahead of time now could make all of life’s little problems much easier to manage later!
How Do You Replace a Car Horn?
Exact Answer: To replace a car horn, begin by disconnecting the negative battery terminal, then unscrew the old horn from its mounting bracket and unplug it from its wiring harness. Then install a new horn in reverse order, plugging it into the wiring harness and screwing it onto the mounting bracket. Finally, reconnect the negative battery terminal.
Replacing an old or broken car horn is not complicated but requires some basic automotive knowledge to ensure that you complete each step correctly and safely. Begin by ensuring your vehicle’s engine is off and disconnecting the negative battery terminal to avoid any possible electrical shock or damage to other components while working on your vehicle’s electrical system. Once that has been done, locate your existing car horn which should be mounted on a bracket near the front of your vehicle; use an appropriate sized wrench or socket set to loosen screws and detach it from its mount before unplugging it from its wiring harness connector.
Now you can attach your new car horn using these same steps in reverse; first plugging in the new one’s wiring harness connector then secure it with screws onto its mounting bracket before finally reconnecting the negative battery terminal back onto your vehicle’s battery post. With this procedure complete, you should now have successfully replaced your car’s old or damaged horn with a brand-new unit!
Conclusion
Replacing the horn on your 2018 F150 is a relatively easy task that can be completed with just a few basic tools. By following these steps, you can complete the job quickly and without any major problems. With proper care and maintenance, you should find that your new horn will last for many years to come.
Taking the time to replace your vehicle’s horn on a regular basis will ensure it runs smoothly and reliably for years to come.