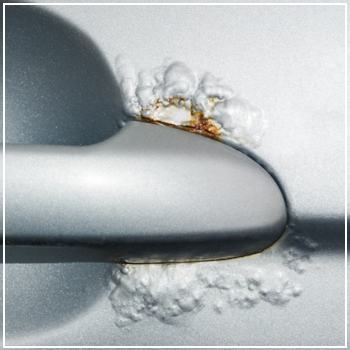
These blisters can form due to a variety of reasons such as moisture, rust or improper paint application. Not only do they look unsightly, but they can also lead to more severe damage if left unchecked.
The good news is, fixing car paint bubbles is a relatively straightforward process that can be done at home with some basic tools and supplies. In this article, we’ll go over the steps you need to take to get your car looking its best again.

Credit: dasilvaautobody.com
Try to Understand about Car Paint Bubbles
Car paint bubbles are a common sight that is often misunderstood. Various factors can cause these unsightly bubbles, such as heat, moisture, and contaminants.
There are two main types of paint bubbles:
solvent pop and air blister.
Solvent pop is caused by excessive solvent in the paint, while air blister is a result of trapped air.
Identifying car paint bubbles is relatively simple – you will notice raised spots on the car’s surface.
By understanding the factors that cause car paint bubbles and knowing how to identify them, you can protect your car’s beautiful finish and ensure it remains in top-notch condition.
Steps For Fixing Car Paint Bubbles
Car paint bubbles can be a frustrating issue, as they not only detract from the vehicle’s appearance but can also lead to further damage if left untreated. Here’s a step-by-step guide on how to fix car paint bubbles:
Materials Needed:
- Sandpaper (various grits)
- Primer
- Automotive paint
- Clear coat
- Paint thinner or wax and grease remover
- Masking tape
- Safety goggles and gloves
- Sander or sanding block
- Clean, lint-free cloths
Step 1: Gather Materials and Safety Precautions:
Ensure you have all the necessary materials ready. Wear safety goggles and gloves to protect yourself from paint fumes and particles.
Step 2: Clean the Affected Area:
Clean the bubbled area thoroughly using paint thinner, wax and grease remover, or a mild detergent. This will remove any contaminants that might affect the repair process.
Step 3: Sanding:
Use a sanding block or sander with low-grit sandpaper (around 220-grit) to gently sand the affected area. The goal is to remove the bubbled paint and create a smooth, even surface. Be careful not to sand too aggressively, as you don’t want to damage the underlying metal or plastic.
Step 4: Feather the Edges:
Smoothly feather the edges around the sanded area to blend it into the surrounding paint. This will help create a seamless transition between the repaired area and the existing paint.
Step 5: Apply Primer:
Apply a thin layer of automotive primer to the sanded area. Primer helps the new paint adhere properly and provides a smooth base for the paint layers. Follow the manufacturer’s instructions for drying time.
Step 6: Apply Paint:
Once the primer is dry, apply thin layers of automotive paint. It’s important to match the color of the existing paint as closely as possible. Apply several thin coats, allowing each coat to dry before applying the next. This helps achieve a more even finish and prevents runs or drips.
Step 7: Apply Clear Coat:
After the paint has dried and you are satisfied with the color match and coverage, apply a clear coat. The clear coat adds shine and protection to the paint. Apply multiple thin coats, allowing each coat to dry in between.
Step 8: Buff and Polish:
Once the clear coat is dry, you can use a fine-grit sandpaper (around 1500-grit) to gently sand any imperfections, like dust particles or minor unevenness. After sanding, use a polishing compound to restore the gloss and shine of the repaired area.
Remember that achieving a perfect paint repair might require some practice, so be patient and take your time. If you’re uncomfortable with this process, consider seeking the help of a professional auto body shop to ensure the best results.
Auto Painting : How to Remove Small Bubbles in an Automotive Paint Job
Preventing Car Paint Bubbles
Car paint bubbles can be a nightmare for any car owner. However, you can prevent them by taking a few protective measures for your vehicle. Regular washing and waxing the car not only keeps it looking good but also protects the paint.
Avoiding parking under direct sunlight and using a car cover can also help. Regular inspection of your car paint can help detect bubbles early on. If you do find bubbles, it’s important to get them fixed immediately by a professional.
Otherwise, they can lead to rust and even more expensive repairs. With these tips, you can easily maintain the health of your car’s paint job and prevent paint bubbles.
Frequently Asked Questions For How To Fix Car Paint Bubbles
How Do Car Paint Bubbles Form?
Car paint bubbles form due to improper paint application, moisture, or rust underneath.
Can I Fix Car Paint Bubbles Myself?
Yes, you can fix car paint bubbles yourself by sanding, cleaning, and repainting the damaged area.
What Tools Do I Need To Fix Car Paint Bubbles?
You will need sandpaper, a paint scraper, a cleaning cloth, car paint, and a spray gun.
Conclusion
After reading this comprehensive guide, fixing car paint bubbles should not be a daunting task anymore. We’ve covered how to identify the causes, the tools you’ll need, and provided you with step-by-step instructions on how to fix the problem. Remember to always work in a well-ventilated area and take your time throughout the process.
Diy techniques might not offer a permanent solution, and in such cases, it’s best to involve a professional to avoid further damage. Regular car cleaning and waxing can also prevent paint bubbles from forming in the first place. No matter how small or large the area is, restoring your car’s exterior can bring it back to its original glory.
We hope this guide has been helpful, and that you can now confidently fix any car paint bubbles that may arise.
