If you have a wiring harness that needs to be repaired, there are a few things that you will need to do. First, you will need to find the damaged wire. Once you have found the damaged wire, you will need to cut it out of the harness.
Next, you will need to splice in a new piece of wire into the harness. Finally, you will need to wrap the new piece of wire with electrical tape.
- First, you will need to disconnect the battery and remove any panels that are in the way
- Next, locate the wiring harness that needs to be repaired and disconnect it from any connectors or other components
- Once the harness is accessible, inspect it for damage and identify which wires need to be repaired or replaced
- If only a few wires are damaged, you can splice them back together using wire connectors
- If the damage is more extensive, you may need to replace sections of the harness with new wire
- Once the repairs are made, reconnect the wiring harness and reattach any panels that were removed during disassembly
Wiring Harness Repair near Me
There are many reasons why you might need a wiring harness repair. Maybe your car was in an accident and the wires were damaged. Or perhaps your car is just getting old and the wires are starting to degrade.
Whatever the reason, there are plenty of places that offer wiring harness repair near you.
Before you take your car to just any shop, it’s important to do some research and find a reputable place that has experience with wiring harnesses. You don’t want to end up with more damage than you started with!
Once you’ve found a few potential shops, give them a call and ask about their experience with wiring harnesses. Get quotes from each one so that you can compare prices.
Once you’ve chosen a shop, they will likely start by inspecting the damage to your wiring harness.
They will then make repairs as necessary, using high-quality replacement parts . The whole process can take several hours, depending on the extent of the damage. But once it’s done, you’ll be back on the road with a safe and reliable car!
Credit: www.partzilla.com
Can a Wire Harness Be Repaired?
A wire harness, also known as a wiring harness or cable assembly, is an assembly of electrical cables or wires which transmit signals or electrical power. They are commonly used in automobiles, aircraft, and spacecraft. Wire harnesses are often complex and require special tools for installation and removal.
Wire harnesses can be repaired if they are damaged. The repair process depends on the type and extent of the damage. Minor damage, such as a broken wire or connector, can usually be fixed with solder or replacement parts.
More extensive damage may require the replacement of an entire section of the harness.
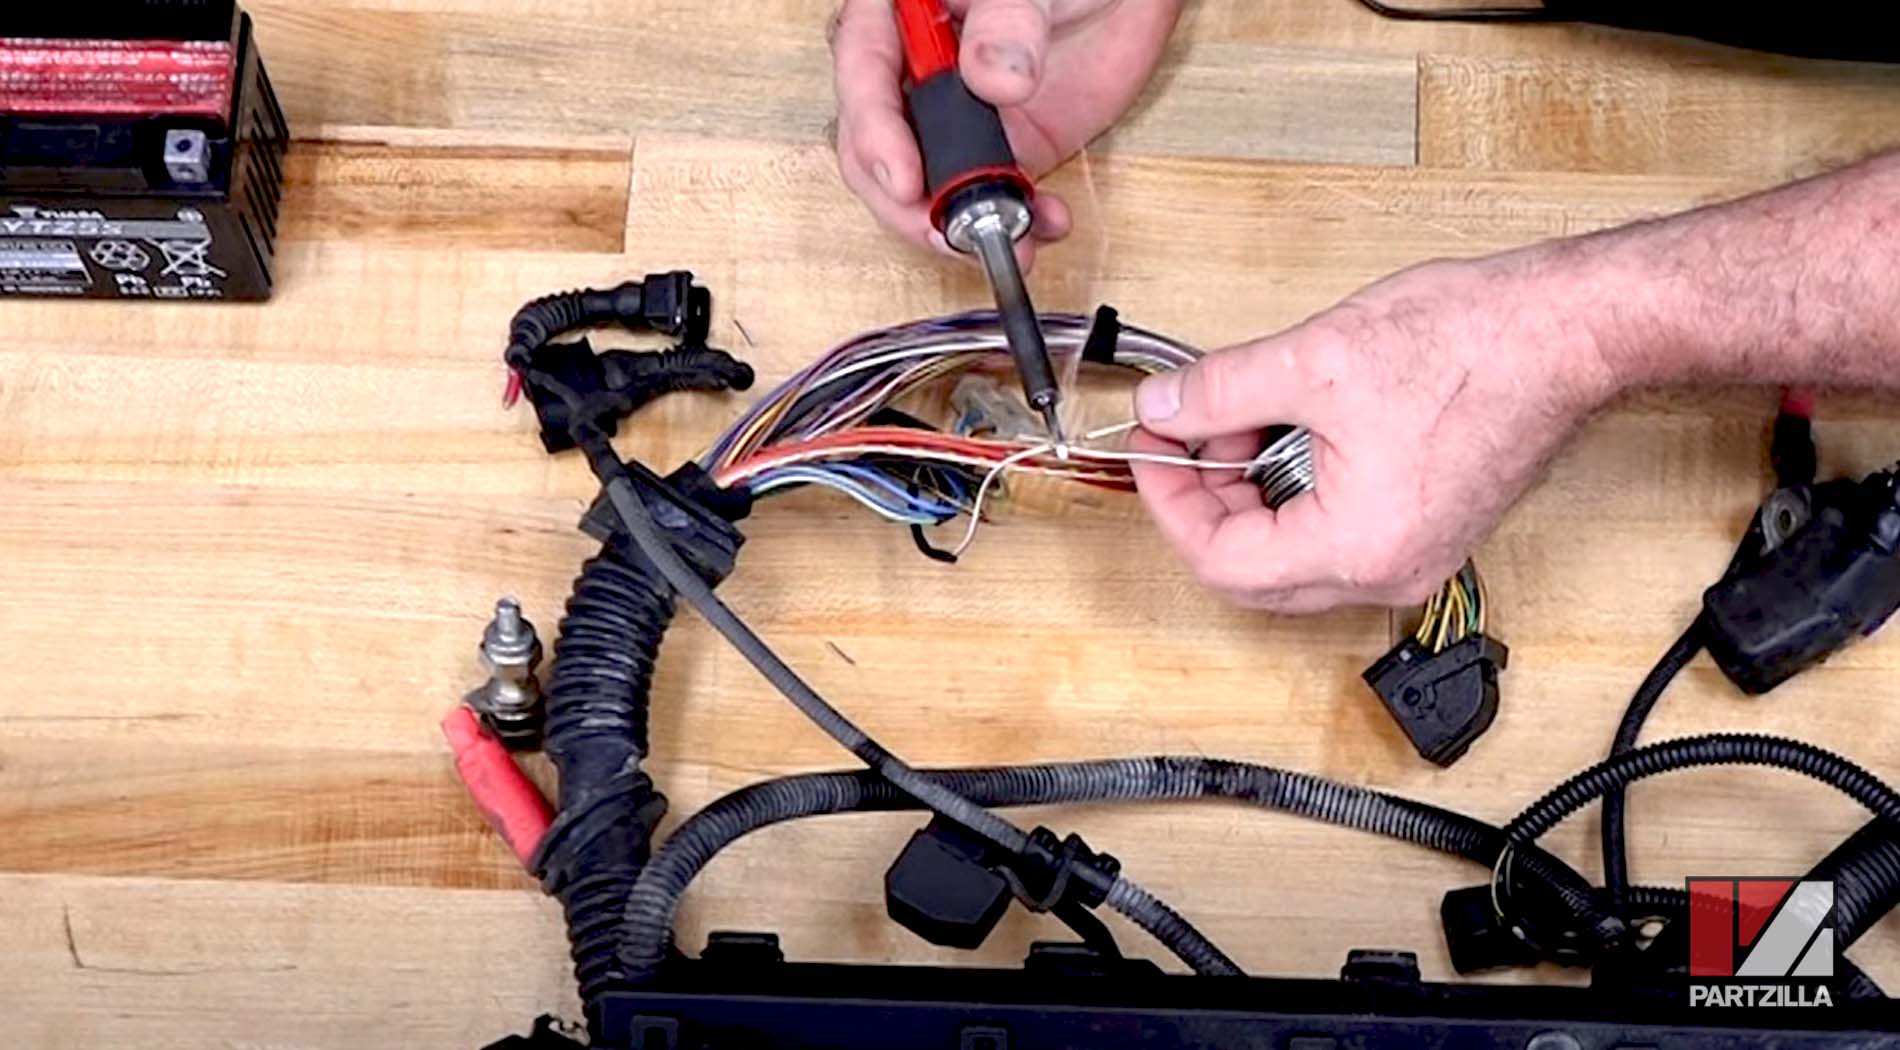
Can You Solder Wiring Harness?
You can solder a wiring harness, but it’s not the easiest thing to do. It’s best to have someone who knows what they’re doing help you out, or at least be there to guide you through the process. First things first, though: make sure all of your tools are ready and that you have a good working space.
You’ll need a soldering iron, some solder, wire cutters, and heat shrink tubing.
Once you have everything set up, start by stripping the insulation off of the wires you’ll be working with. Next, twist each wire together so they’re nice and tight – this will help ensure a good connection.
Now it’s time to start soldering! Put a small amount of solder on the end of your iron and then touch it to both wires where they meet; this will help them melt together more easily. Keep touching the solder to both wires until it flows smoothly between them – don’t overdo it, though!
Finally, slide some heat shrink tubing over the joint and use a lighter or other heat source to shrink it down tightly. That’s it – you’ve successfully soldered a wiring harness!
How Do You Repin a Wiring Harness?
If you need to replace or repair a wiring harness, the process is not difficult. You will need to remove the old wiring harness and then install the new one. Here are the steps to follow:
1. Remove the old wiring harness: First, disconnect all of the wires from the old wiring harness. Next, remove any bolts or screws that are holding it in place. Finally, pull out the old wiring harness.
2. Install the new wiring harness: Insert the new wiring harness into place. Then, reconnect all of the wires to their corresponding terminals. Finally, bolt or screw it into place so it is secure.
How Do You Splice Car Wiring Harness?
If you’re working on a car that has an aftermarket stereo system, there’s a good chance that you’ll need to splice into the vehicle’s wiring harness at some point. This process is relatively simple and only requires a few tools. Here’s everything you need to know about splicing car wiring harnesses.
First, you’ll need to identify which wires in the harness correspond to the left and right audio channels, as well as the ground wire. Once you’ve done this, use a wire stripper to remove about half an inch of insulation from each of these wires. Next, take your RCA cables and strip off about an inch of insulation from each end.
twist the bare copper wire around one of the stripped wires from the vehicle’s harness, and then solder the connection. Repeat this process for each of the remaining wires. Finally, use electrical tape or heat shrink tubing to insulate any exposed wire connections.
Once everything is properly taped up or covered, plug your RCA cables into your aftermarket stereo head unit and test out your new sound system!